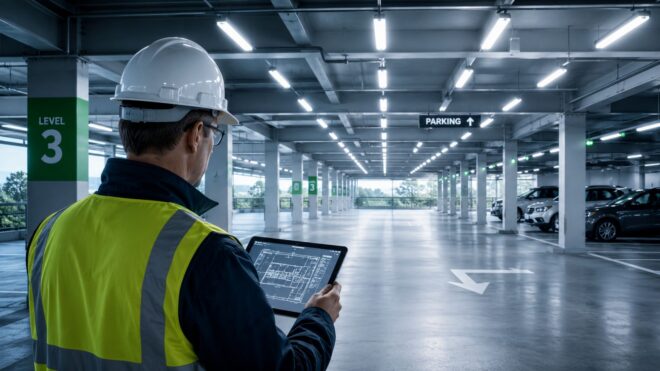
A lot of parking garage LED lighting projects start the same way. The property manager is getting tenant complaints about dim corners, maintenance is tired of chasing lamp outages, and the utility bill keeps climbing even though the garage still feels underlit after dark. Add one security incident or one failed inspection note, and the lighting conversation moves from “someday” to “right now.”
Traditional garage lighting usually breaks down in three places at once. It wastes power, it creates uneven visibility, and it demands more labor than most budgets account for. Old HPS, metal halide, and fluorescent systems also age badly. Output drops, color gets worse, fixtures fail one by one, and the garage ends up with bright patches next to dead zones.
That's why parking garage LED lighting has become the default upgrade path for a lot of multifamily, commercial, and mixed-use properties. A good retrofit doesn't just lower energy use. It also cuts service calls, supports code compliance, improves visibility for drivers and pedestrians, and gives security teams a better chance of getting usable camera footage.
The catch is that not every LED project is designed well. Some save energy but create glare. Others dim aggressively enough to satisfy a utility target, then leave CCTV analytics struggling in standby mode. The garages that work well are the ones where fixture choice, sensor logic, light levels, and compliance are planned together.
Introduction to Parking Garage LED Lighting
If you manage a garage, you've probably seen the pattern. One row has flickering lamps, another row is brighter because those fixtures were replaced last year, and the ramp feels darker than it should during the evening rush. Drivers notice. Residents notice. Security notices.
In practice, the lighting problem is rarely just a lighting problem. It becomes a maintenance scheduling problem, a liability problem, and a budgeting problem. A single failed fixture in a warehouse is one thing. A failed fixture above a driving aisle, stair landing, or payment area creates a very different risk profile.
Older systems also hide their true cost. The power draw is obvious. The labor isn't. Every relamp cycle, lift rental, after-hours access window, and troubleshooting visit adds cost that never shows up on the fixture cut sheet.
Practical rule: If a garage needs repeated spot repairs, mixed lamp types, and frequent complaint-driven service calls, the issue usually isn't individual fixtures anymore. It's the whole lighting strategy.
A properly designed LED upgrade addresses all of that at once. It gives you steadier output, better control options, longer service intervals, and a cleaner path to code documentation. For California properties, it also makes the controls side of compliance much easier to manage when the retrofit is planned correctly from the start.
Understanding LED Technology in Parking Garages
LEDs took hold in parking structures because they solve the exact problems garages create. Fixtures run for long hours, access is inconvenient, ambient conditions are rough, and visibility matters more than it does in many indoor spaces.
The adoption curve reflects that fit. LED penetration in parking garages reached 32.5% in 2016, while parking lots reached 26.2%, according to the U.S. Department of Energy's LEEP campaign article on parking lighting validation. That same source notes that 100 lumens per watt became the minimum effective output standard, and that LED parking garage fixtures typically offer lifespans exceeding 50,000 hours compared with 10,000 to 20,000 hour metal halide or fluorescent systems (U.S. DOE LEEP campaign findings).
What the specs actually mean
A lot of buyers focus on wattage first. That's understandable, but it's incomplete. In garages, these spec lines matter more:
- System efficacy: Higher lumens per watt usually means lower connected load for the same target illuminance.
- Rated life: Longer life matters because fixture access in parking decks is slow and disruptive.
- Control compatibility: If the driver won't play nicely with dimming and occupancy controls, the savings model falls apart.
- Certification path: Rebate programs commonly look for DLC-listed products, so fixture paperwork matters almost as much as fixture performance.
Where cheap fixture choices go wrong
On paper, many fixtures look close. In the field, they don't behave the same. Some low-end products produce acceptable average foot-candles at initial startup, but the visual result is poor because the optics create hot spots and harsh glare. Others hit an attractive price point by compromising the driver, gasket quality, or control readiness.
For contractors and facility teams, the better upgrade goal is simple. Buy a fixture that supports the lighting plan, the controls plan, and the maintenance plan at the same time. If one of those three is weak, the garage will show it fast.
Designing Lighting Layout for Coverage and Uniformity
A garage lighting layout fails when someone designs to average light level alone. Drivers and pedestrians don't experience averages. They experience bright spots, shadows, veiling glare, and sudden transitions.
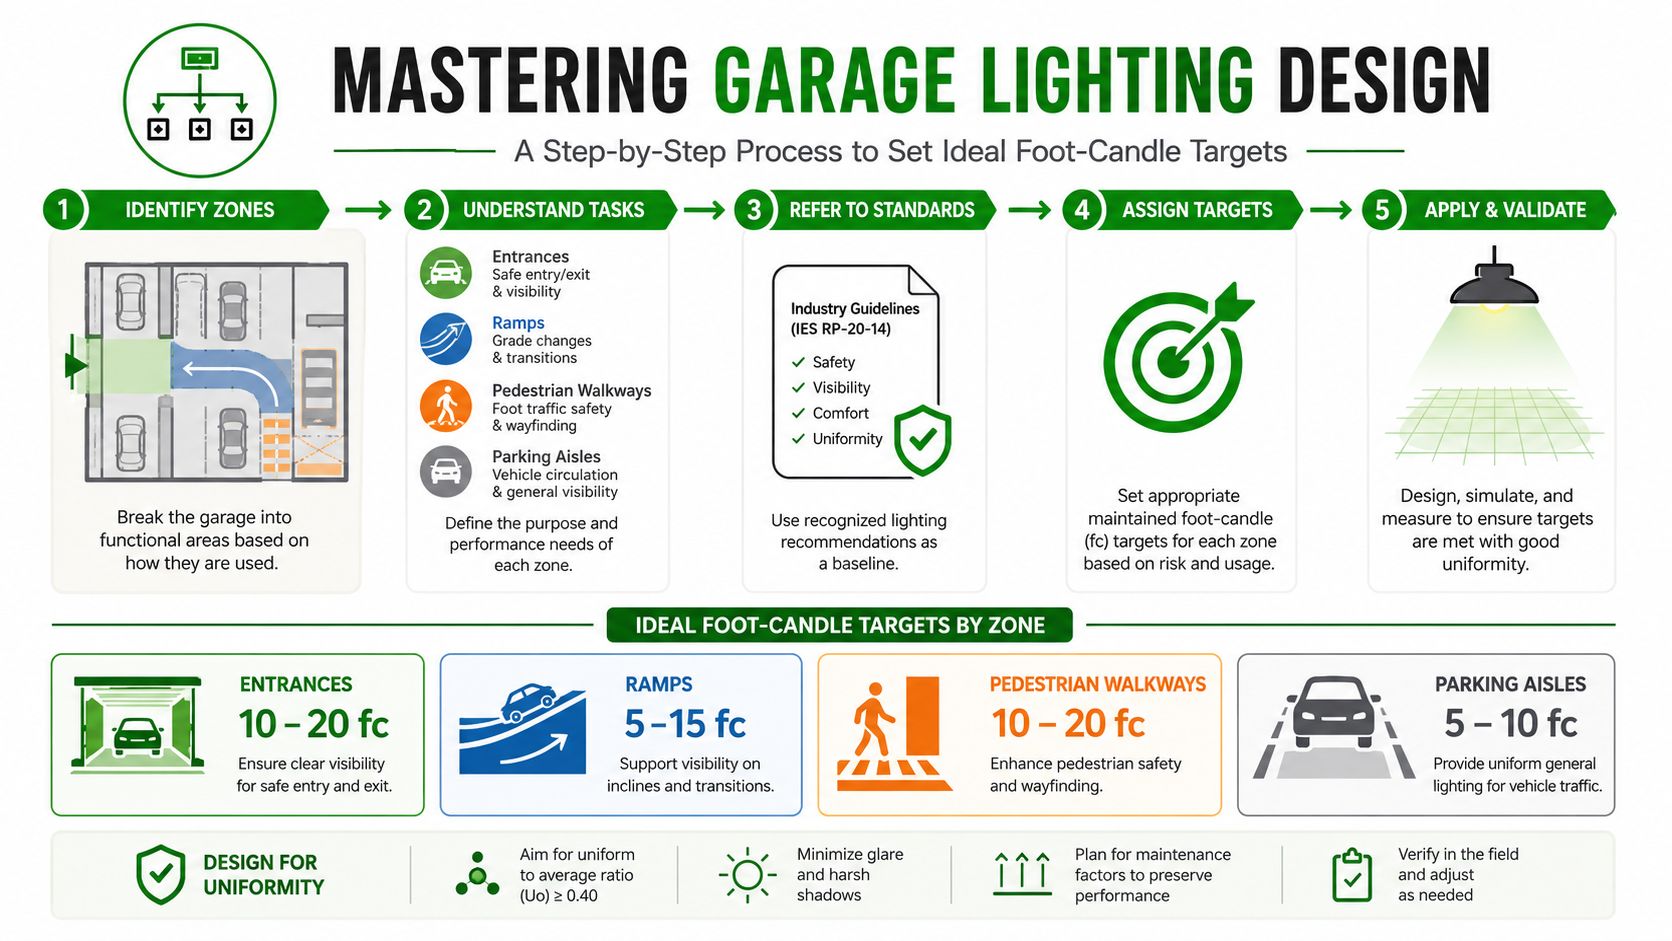
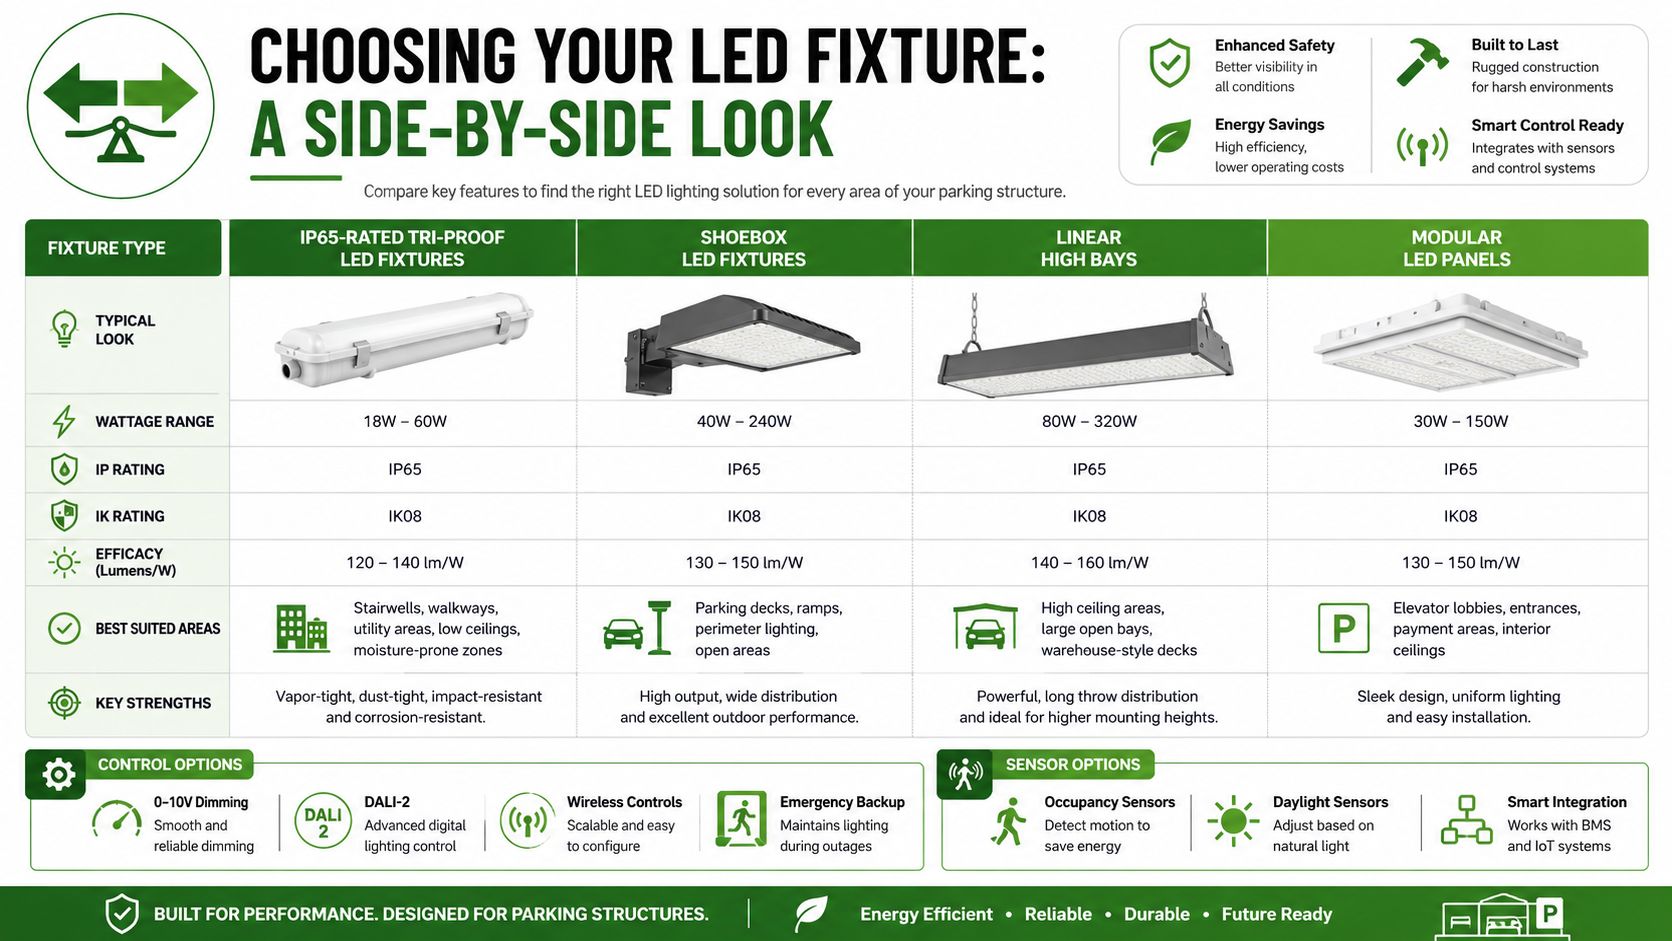
The IES benchmark that matters here is a maximum-to-minimum illuminance uniformity ratio of no higher than 10:1, along with 6 fc average in general parking areas with 1 to 2 fc minimum, 10 fc at entrances, ramps, and pedestrian gathering areas, and up to 50 fc in daytime transitional entrance zones (parking facility lighting best practices from THA Consulting). That transition requirement is where many retrofits miss badly. A ramp that looks acceptable at night may still feel like a cave during the day.
Start by dividing the garage into lighting zones
Treat each zone separately before you place a single fixture:
- General parking aisles need stable, broad coverage without dramatic falloff between fixtures.
- Pedestrian paths and elevator lobbies need stronger vertical visibility, not just floor light.
- Ramps and turns need cleaner contrast so drivers can read edges, curbs, and approaching vehicles.
- Daytime entrance transitions need enough light to reduce the black-hole effect when drivers move from bright outdoor conditions into the structure.
If you need to convert plans or field readings between measurement systems, use a simple foot-candles to lux conversion reference during layout review and commissioning.
Build the layout around overlap, not fixture count
A common mistake is spacing fixtures by eye according to structural bays. That's fast, but it often produces alternating bands of overlit and underlit pavement. Better layouts are built around photometric overlap. You want each fixture helping its neighbor enough to smooth the lows without stacking so much light that glare becomes the dominant visual issue.
A practical review sequence looks like this:
- Check mounting conditions: Ceiling height, beam obstructions, exposed conduit, and beam pockets all affect delivered light.
- Review drive lanes first: If the aisle pattern works, stall lighting usually becomes easier to solve.
- Look at the minimums: The dark point matters more than the brightest point in most complaints.
- Test transition areas separately: The entry condition should never be an afterthought.
Don't approve a layout because the average foot-candle looks good. Approve it because the low points, transitions, and visual comfort all hold together.
Control the glare while you chase uniformity
Many garages swap in brighter LED fixtures and accidentally create a different problem. Bare, high-output point sources can feel harsh, especially in low ceilings and polished concrete environments. Optics, shielding, and lens choice matter. The goal isn't raw brightness. The goal is useful visibility with consistent recognition of people, vehicles, markings, and hazards.
Comparing Fixtures Controls and Sensor Options
Fixture selection should match the physical conditions of the garage. Control selection should match how the garage is used. That's where many specifications drift apart.
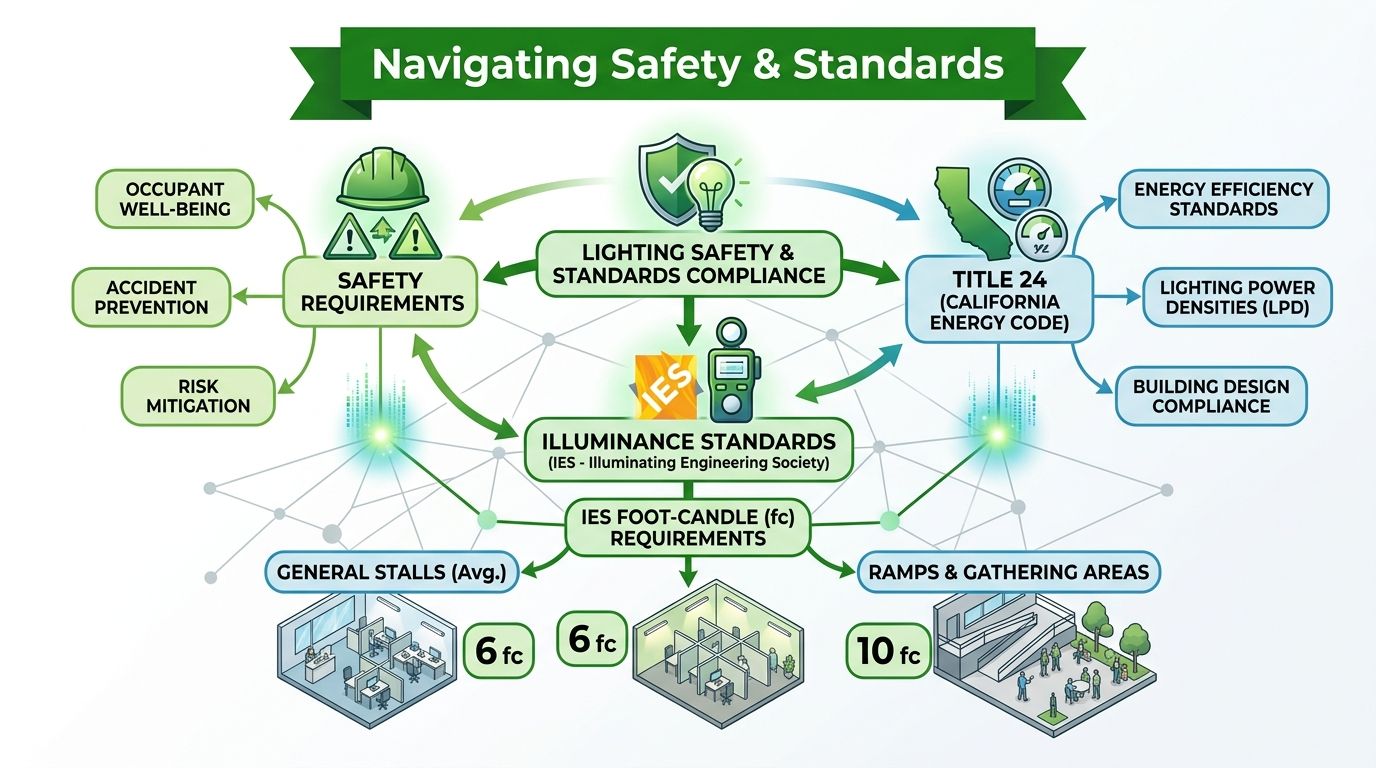
Modern IP65-rated tri-proof LED fixtures can deliver 130 to 160 lm/W, cut lighting energy consumption by 60% versus legacy fluorescent systems on a standalone basis, and reach 80 to 90% savings when paired with DALI-2 dimming and motion-sensor controls, with ROI under 2 years in the cited guide (parking lot LED lighting guide).
Fixture families and where they fit
| Fixture type | Where it usually works well | Watch-outs |
|---|---|---|
| IP65 tri-proof fixtures | Open-sided decks, damp or dirty environments, low to mid ceiling applications | Verify optics and driver quality, not just enclosure rating |
| Shoebox styles | Perimeter or open-air sections with higher mounting points | Can produce harsh glare indoors if optics aren't controlled |
| Linear high bays | Long aisles with predictable mounting rows | Need careful spacing to avoid striped light patterns |
| Modular panels | Areas where a cleaner visual profile matters | Not every product line is rugged enough for exposed garage conditions |
Controls that work and controls that create headaches
Occupancy control can save a lot of energy in garages, but only if the response fits real traffic flow. Sensor dead zones, overaggressive dimming, and slow return-to-full-output settings create complaints quickly.
Here's the basic trade-off:
- PIR sensors work best where line-of-sight is clean and traffic patterns are simple.
- Microwave sensors can detect movement more broadly, which can help in obstructed bays, but they need careful commissioning to avoid nuisance operation.
- Daylight harvesting makes sense near open perimeters and upper levels. It's less useful in enclosed decks with little daylight variation.
- 0 to 10V dimming is common and straightforward.
- DALI-2 systems offer more granular control and better scalability when the project needs zoning, reporting, or future reconfiguration.
For teams evaluating options beyond standalone fixtures, automated lighting controls for commercial properties are worth reviewing alongside the electrical scope so the lighting, occupancy logic, and documentation all align.
The hidden trade-off most specs ignore
Very low standby settings may look great in the savings model but fail the security test. A garage can meet a basic occupied-path expectation and still leave cameras with weak image quality during vacancy mode. That matters if the property expects analytics, facial detail, or color retention after hours.
The right answer usually isn't “never dim.” It's “dim with intent.” Set standby scenes based on actual camera performance, not just on a generic low-light assumption.
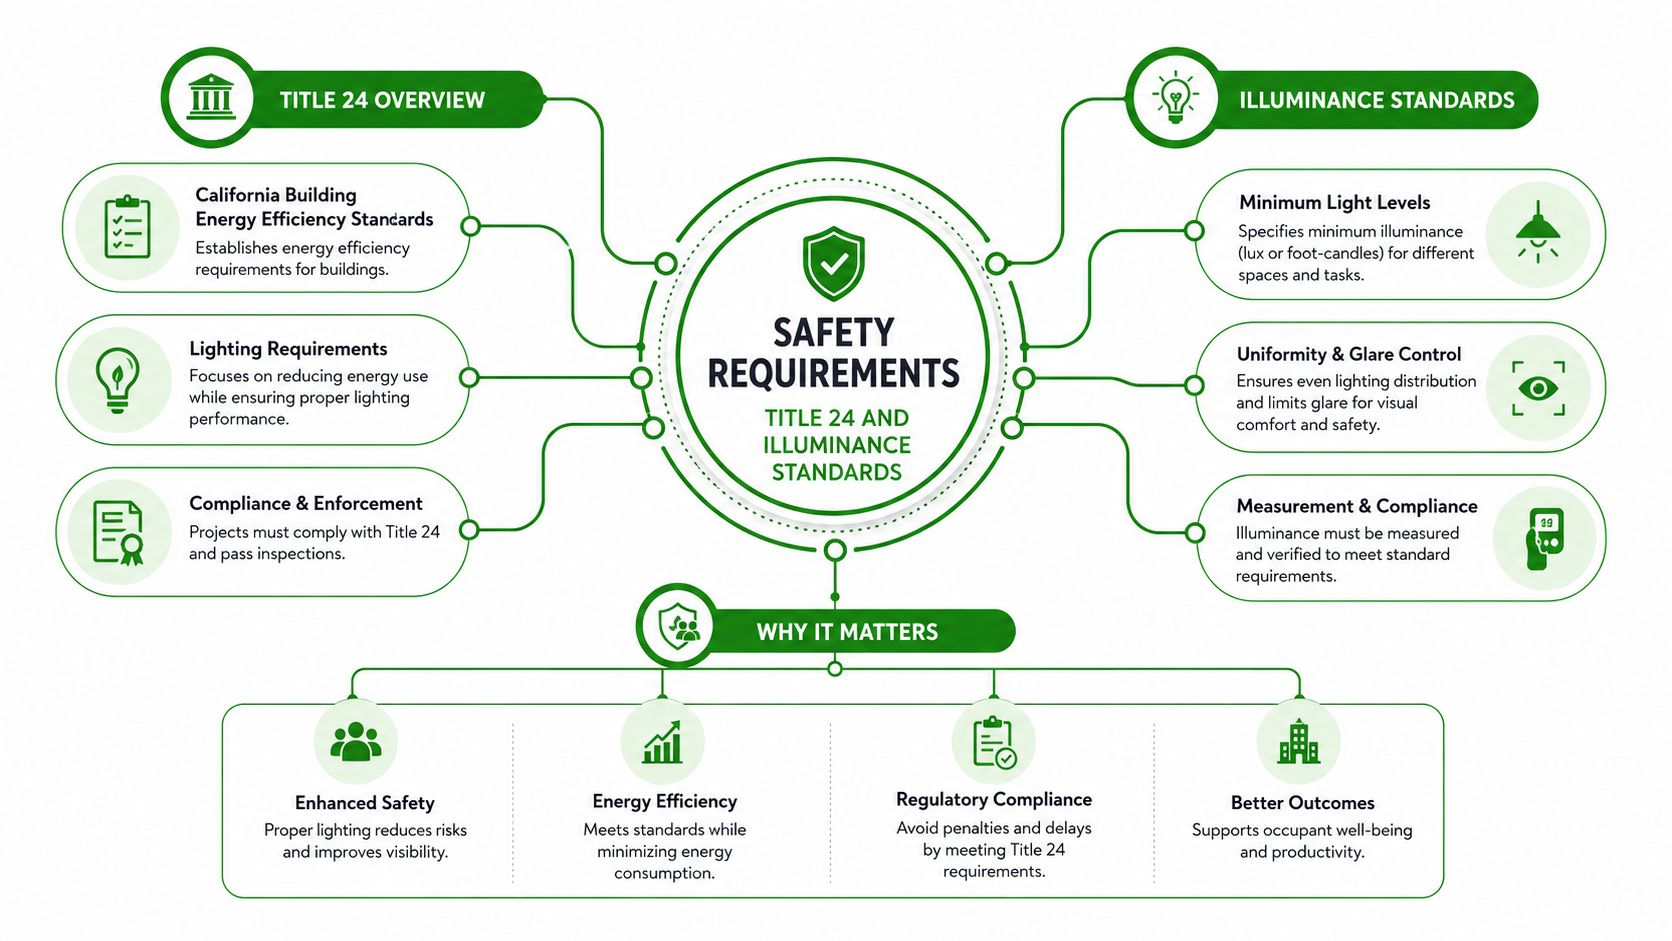
Safety Requirements Title 24 and Illuminance Standards
Garage lighting compliance lives at the intersection of visibility, emergency egress, controls, and documentation. Teams that focus only on fixture replacement often end up revisiting the job because the paperwork or testing wasn't handled correctly.
The IES guidance already discussed establishes the visual baseline for normal operation. NFPA adds another layer by requiring at least 1 fc on emergency exit pathways with backup power, as noted in the same parking facility best-practices source cited earlier. That requirement changes how you plan emergency circuits, battery backup, and test records.
What inspectors and owners both care about
The field issues that trigger scrutiny are usually predictable:
- Uneven light distribution: Dark patches near stairs, corners, or payment areas.
- Glare complaints: Drivers can't comfortably adapt between fixtures and shadows.
- Poor emergency documentation: Backup lighting exists, but the test records are incomplete.
- Control misalignment: The installed sequence doesn't match the design intent or code path.
For California projects, Title 24 adds controls, acceptance testing, and documentation requirements that need to be treated as part of the lighting package, not as a separate admin task at closeout. A concise Title 24 compliance overview for lighting projects can help facility teams frame what has to be documented before sign-off.
Glare control is a compliance issue too
A garage can technically hit target light levels and still feel unsafe. That usually happens when the fixture throws intense light at shallow viewing angles. Shielding, lens selection, and placement near driver approach lines matter because visual discomfort changes how quickly people identify pedestrians, curbs, and turning vehicles.
Field note: If occupants describe a garage as “too bright” and “hard to see” at the same time, the problem usually isn't excess light. It's poor optical control.
Calculating Energy Savings and ROI for Retrofits
The cleanest retrofit business case starts with the existing fixture schedule. Count the fixtures, note the input wattage, document operating hours, and separate always-on zones from zones that can realistically dim. If those inputs are wrong, the ROI math won't mean much.
Verified project data gives a solid planning range. LED retrofits in parking garages consistently achieve energy savings between 52% and 71% when replacing HPS or metal halide fixtures, with reductions up to 87% when combined with occupancy and daylight sensors. In one Washington, DC garage, a conversion from 129.5W HPS to 61.8W LED fixtures yielded 52% energy savings, and that climbed to a 95% reduction when occupancy sensors dimmed the system to 10% power during vacancy (U.S. Department of Energy parking garage case brief).
How to model a retrofit without fooling yourself
A useful estimate includes four layers:
Baseline connected load
Pull actual fixture wattage from the field when possible. Nameplate assumptions can be wrong on older systems.Proposed LED connected load
Use fixture input wattage, not advertised equivalent wattage.Control-adjusted operating profile
Don't assume every area will dim the same way. Ramps, cashless pay stations, stairs, and pedestrian nodes often need different sequences.Maintenance effect
Include labor reduction qualitatively even if your accounting team tracks it outside the utility budget.
What a strong ROI case usually looks like
The case gets stronger when the garage has one or more of these conditions:
- Long daily operating hours: More run time increases the value of each watt removed.
- Hard access conditions: The maintenance savings become easier to justify.
- Mixed aging fixture types: Standardizing the system simplifies service inventory and troubleshooting.
- Control-ready zones: Vacancy dimming and daylight response increase returns where the space allows it.
Another verified project in the DOE brief showed a large retrofit replacing 845 existing 175W metal halide fixtures with 54W LED luminaires, cutting electrical load by 75%, producing $116,000 in annual operational savings, and reaching a 3.5-year payback period, as noted in that same DOE document. Those are the kinds of numbers that get attention from ownership because they connect engineering decisions to budget outcomes.
A practical warning: don't oversell the control savings before the sensor plan is proven. The biggest financial disappointments in garage projects usually come from assuming aggressive dimming schedules that the site can't tolerate once security, tenant comfort, and traffic flow are considered.
Installing Testing and Maintaining LED Systems
A parking garage lighting project isn't done when the fixtures are hung. The quality of commissioning determines whether the system performs like the design or just looks good on turnover day.
Installation checks that prevent callbacks
Before energizing, verify the delivered products against submittals and controls schedules. Contractors should confirm fixture model, driver type, control compatibility, and enclosure condition on arrival. In garages, damaged gaskets, loose lenses, and substituted drivers cause trouble later, especially in damp or open-sided decks.
On the install side, pay attention to:
- Mounting security: Garage vibration, traffic movement, and open-air exposure punish loose hardware.
- Sealing details: Damp locations expose weak seals fast.
- Circuit identification: Future maintenance gets easier when zones and control groups are clearly labeled.
- Sensor placement: A good sensor mounted in the wrong spot still performs badly.
Commissioning should happen at more than one light level
A common mistake is checking the system only at full output. That misses the actual operating issue, which is how the garage behaves in occupied, unoccupied, and emergency conditions. Use a light meter, review the dimming scenes, and walk the garage like an actual user would. Drive it. Walk it. Stop in corners. Check stair landings and transitions.
Test the garage in the mode it will actually spend most of its life in, not just in full-bright startup mode.
If cameras are part of the security plan, coordinate a nighttime review with the security vendor or property team. Verify what the cameras can see during standby scenes. That step catches a lot of avoidable disputes before closeout.
Maintenance after turnover
LED systems need less routine lamp work, but they still need attention. A strong maintenance program usually includes:
- Cleaning schedules: Dirt and exhaust film reduce delivered light over time.
- Control reviews: Sensor timing and zoning often need fine-tuning after occupancy patterns become clear.
- Emergency system checks: Backup operation still requires testing and records.
- Infrared inspections: Electrical hot spots in panels, feeders, or control enclosures should be found before they become outages.
For Southern California owners who want one contractor handling parking structure lighting, controls, emergency systems, and electrical diagnostics, Access Electrical and Lighting provides those scopes as a commercial service option.
Common Pitfalls and Next Steps for Professional Services
Most underperforming garage retrofits fail in design, not in hardware. The fixture may be perfectly good, but the layout ignores uniformity, the sensors are aimed poorly, or the standby dim level was chosen for savings without checking what security cameras need.
That last issue deserves more attention than it gets. Existing content rarely addresses the critical gap between minimum code requirements and the illuminance needed for advanced CCTV analytics in low-light standby modes, which creates a real safety-versus-security blind spot for property managers (parking garage lighting requirements and CCTV discussion). In the field, that means a garage can look compliant on paper and still leave security with weak footage when they need it most.
The safest next step is a structured site survey. That should include a fixture inventory, photometric review, controls strategy, emergency lighting check, and a camera coordination discussion before dimming scenes are locked in. Trial-and-error costs more in occupied properties because every correction means another lift, another shutdown window, and another round of tenant frustration.
If your property needs a practical plan for parking garage LED lighting, Access Electrical and Lighting can help with site surveys, retrofit installation, controls, Title 24 documentation, emergency lighting support, and ongoing maintenance for commercial and multifamily facilities in Southern California.