Permitting alone won't explain a commercial charging budget. The U.S. Department of Energy Alternative Fuels Data Center cost report estimated installation costs of approximately $600 to $12,700 for Level 2 and $4,000 to $51,000 for DC fast charging. That spread is the story behind every EV charging station installation cost. The charger sets a baseline, but your panel, trenching distance, and utility work decide where you land. If you're comparing bids on hardware price alone, you're comparing the smallest part of the project.
Installed Cost Ranges by Charger Type
Per-connector benchmarks help compare charger types, but they do not make unlike projects equivalent. The U.S. Department of Energy's Alternative Fuels Data Center reports residential Level 1 installation at approximately $400 to $600 per connector, residential Level 2 installation at about $1,300 per connector before labor and permitting, public and workplace Level 2 installation averaging roughly $2,500 per connector, and DC fast-charging installation at approximately $20,000 to $60,000 per connector. It also puts public Level 2 equipment at approximately $3,500 per connector and DC fast equipment at $38,000 to $90,000 per connector. Treat these as comparison points, not a site quote.
| Charger type | Equipment per port | Installed per port | Common benchmark |
|---|---|---|---|
| Level 1 | $300 to $1,500 | $0 to $3,000 | About $400 to $600 residential basic installation |
| Level 2 | $400 to $6,500 | $600 to $12,700 | About $2,500 average for public and workplace installs |
| DC fast charging | $10,000 to $40,000 pre-installation, recent DOE figures $38,000 to $90,000 | $4,000 to $51,000 | $20,000 to $60,000 installation per connector |
Level 1 and Level 2 in Plain Terms
Level 1 sets the lower-cost benchmark. Equipment at $300 to $1,500 and installed cost at $0 to $3,000 reflect simpler electrical needs, often an existing circuit and limited construction. It is rarely a close match for a retail, office, or multifamily charging amenity where drivers expect a meaningful charge during a visit or overnight stay.
Level 2 is the more relevant starting point for many commercial budgets. Equipment ranges from $400 to $6,500, installed cost runs $600 to $12,700, and the public and workplace installation benchmark is roughly $2,500 per connector. That average can conceal major differences: a wall-mounted charger near a panel with spare capacity has a different project cost from a pedestal across a concrete lot. The hardware may be identical while conduit, trenching, and panel work change the total.
DC Fast Charging and Why Two Ranges Appear
The DC fast-charging figures describe different scopes. One installed range is $4,000 to $51,000 per port in the DOE cost report. A separate DOE and NREL benchmark puts installation alone at $20,000 to $60,000 per connector, with equipment at $38,000 to $90,000 in recent DOE figures for higher-power units. Because the scopes and power levels differ, keep each benchmark labeled in a budget rather than combining them into a single range.
Practical rule: Multiply the closest per-port row by your planned port count. Use the result to test a budget, not as a quote.
How to Use This Baseline
Separate equipment, installation, and site infrastructure in your comparison. That makes it easier to see whether a low hardware price excludes work needed to make the chargers usable. For Southern California sites, check service capacity, distance from the electrical room, trenching or concrete work, and whether simultaneous charging requires panel or transformer upgrades. Geography, labor, site conditions, and future demand also affect the installed total.
Then ask which benchmark a contractor used, what work it includes, and which site conditions could move the project beyond that range.
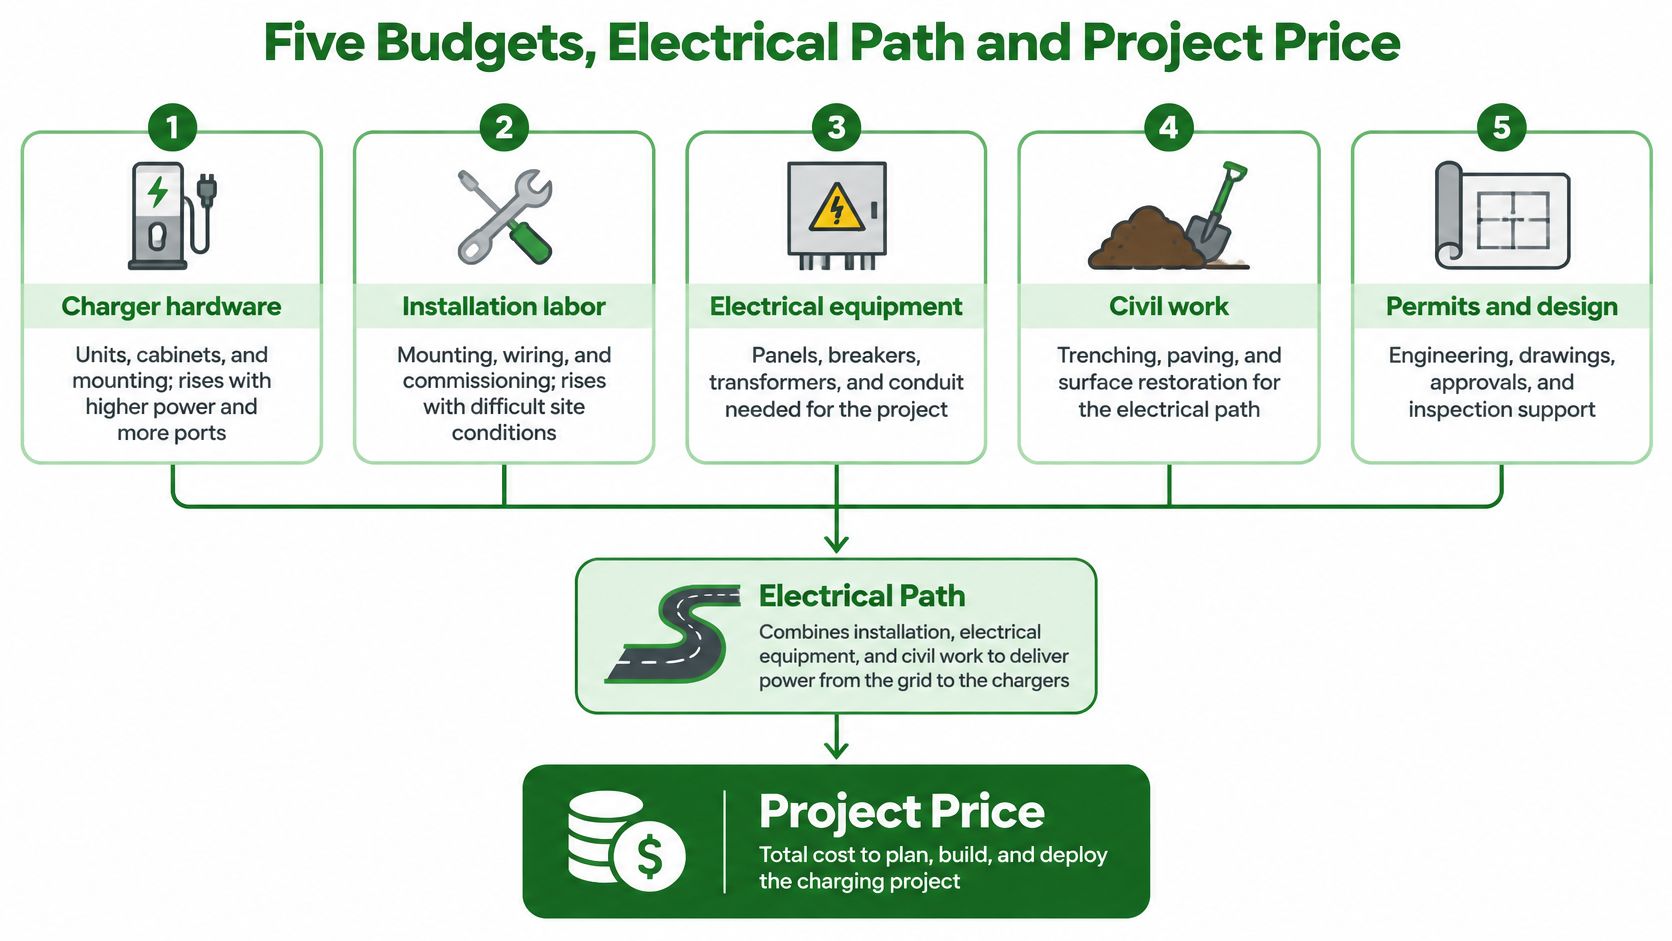
Five Budgets, Electrical Path and Project Price
A commercial quote contains five budgets, and the charger is only one of them.
| Budget | What It Covers | What Pushes It Higher |
|---|---|---|
| Charger hardware | Charger units, cabinets and mounting hardware | Higher power output, more ports, networking features |
| Installation labor | Mounting, wiring and commissioning | Difficult mounting surfaces, ports installed in separate phases |
| Civil work | Trenching, conduit, concrete and surface restoration | Long underground runs, saw-cut concrete, repaving |
| Electrical service capacity | Panel, breakers, transformer and switchgear | Undersized service, new transformer, electrical room far from stalls |
| Permits and utility fees | Plan review, inspections and utility make-ready | Local review times, utility-side upgrades |
The U.S. Department of Energy figures reported in Electrify America's 2025 national annual report put multifamily Level 2 installations at about $6,000 per connector downstream of the panel as of 2025, while upstream service upgrades, trenching, meters, switchgear, electrical rooms, and feeders can vary widely. That distinction matters. Downstream covers branch circuits and chargers after the panel. Upstream covers the capacity that feeds them.
The DOE and NREL best-practices guide places pre-installation equipment at roughly $400 to $6,500 for Level 2 and $10,000 to $40,000 for DC fast infrastructure, while installation alone can range from $0 to $51,000 per unit. A short conduit run from an adequately sized panel keeps Level 2 near the low end. Long runs, concrete restoration, or a new transformer dominate the budget.
Follow the electrical path in order: utility service, building distribution, panel and switchgear, branch circuits, then chargers. We offer switchgear and electrical panel services, including switch gear installation and switch gear relocation, and our guide to electrical panel upgrade cost helps you price that link separately. We also offer underground electrical locating and documentation, utility vault installation, and utility duct bank installation, which belong in the civil and utility budgets, not hidden inside hardware.
Before comparing bids, ask where the nearest panel with spare capacity sits, how long the conduit run is, and whether underground locating, utility vaults, and concrete repair are included.
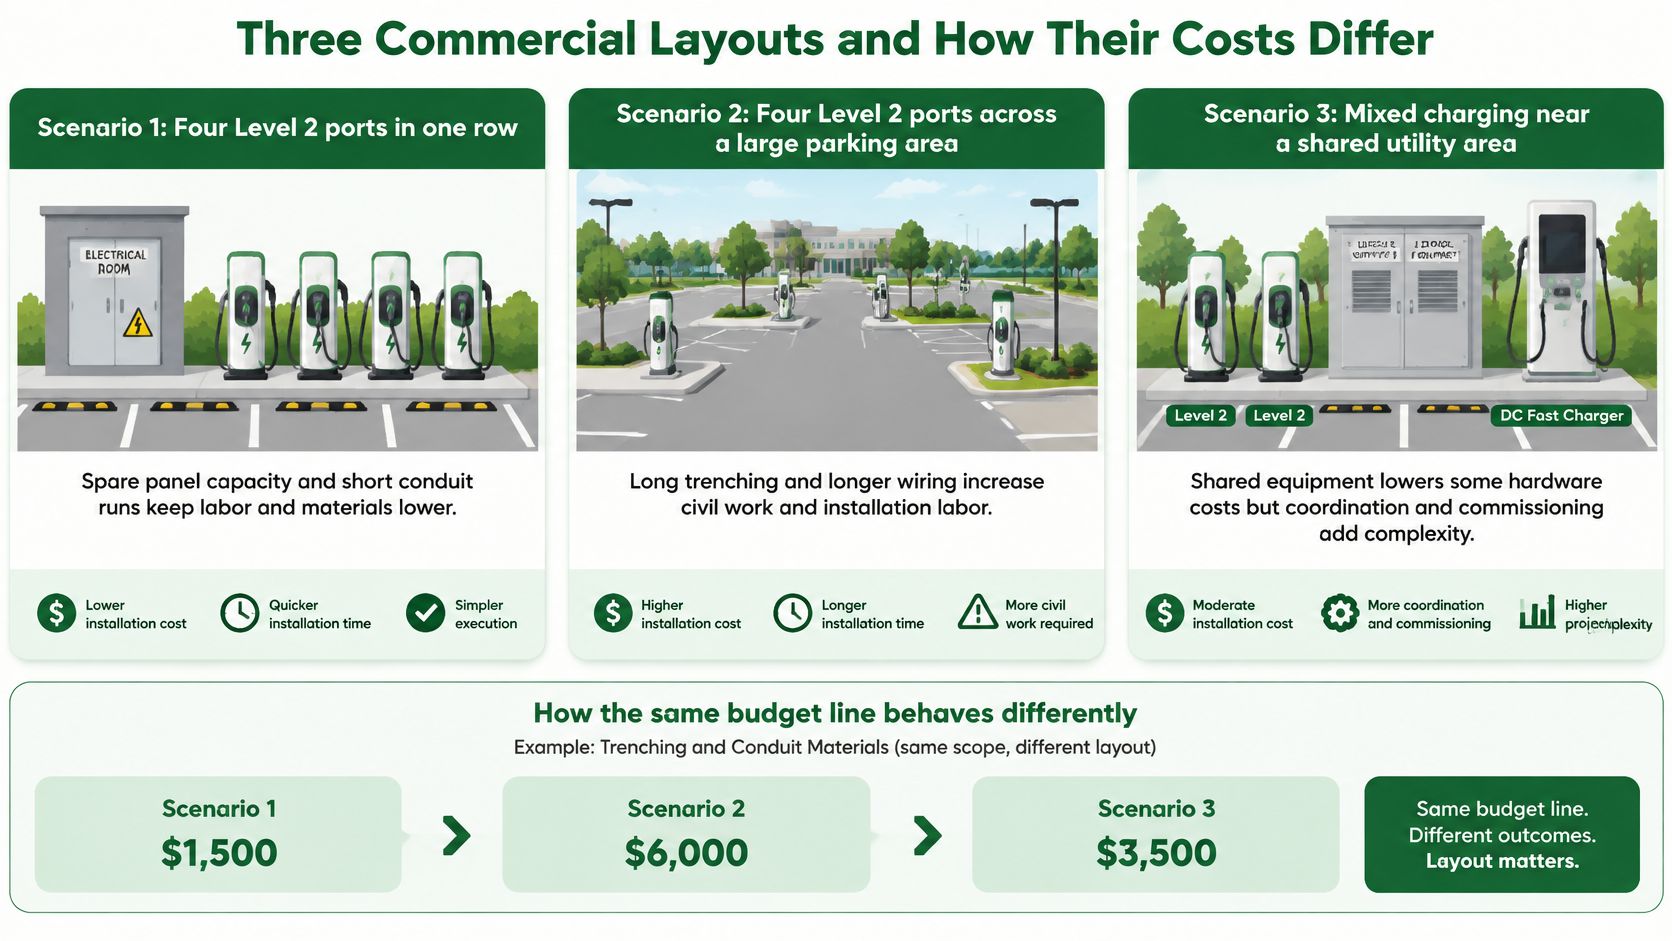
Three Commercial Layouts and How Their Costs Differ
Say a small office property wants four Level 2 ports in one row beside its electrical room. The panel has spare capacity, the conduit run is short, and one trench serves all four stalls. Crews mobilize once, inspections cover one compact area, and surface restoration stays limited. That's the layout that can sit near the low end of the Level 2 range. The turning point isn't a discount on chargers. It's shared infrastructure.
Now move one port to the far edge of a retail parking lot. The charger model hasn't changed, but the electrical path has. The crew must locate underground utilities, saw-cut concrete or asphalt, trench across drive aisles, install longer conduit and conductors, then restore the surface and restripe the stall. Traffic control and phased work may be needed so customers can still park. In that illustrative case, civil work becomes the largest line, and a single remote port carries trenching and switchgear costs that four clustered ports would share.
Multifamily Ports and the Upstream Variable
A multifamily property tells a different story. The owner may plan several Level 2 ports for residents, with access control, metering, and future stalls roughed in. The useful anchor is the DOE multifamily figure of about $6,000 per connector downstream of the panel, but that anchor doesn't settle the project price. Upstream work is the variable line: service size, feeders, meters, switchgear, and whether the electrical room can support simultaneous overnight charging.
That's why two apartment properties with the same port count can receive very different bids. One has spare capacity near the garage. The other needs distribution upgrades before the first branch circuit is legal or practical. If a bid quotes only the downstream figure, ask what's assumed upstream and what's excluded.
DC Fast Charging With a Service Upgrade
Add DC fast charging and the balance shifts again. Say a retail center wants one high-power unit near the main entrance, but the existing service can't support it. The project now includes utility coordination, a transformer or switchgear upgrade, larger feeders, protective bollards, and heavier civil work. Electrical service capacity can rival the charger cost, pushing the project toward the upper end of the DC fast ranges already shown. The visible cabinet is not the expensive surprise. The invisible capacity behind it is.
| Scenario | Budget line that changes | Cost position |
|---|---|---|
| Four Level 2 ports in one row beside an electrical room with spare panel capacity | Civil work and panel work stay small | Low end of the Level 2 range |
| Single port at the far edge of a parking lot | Civil work becomes the largest line | Same charger, higher total |
| Multifamily Level 2 ports | Upstream service work is the variable line | Downstream anchor of about $6,000 per connector (DOE, 2025) |
| DC fast charging with transformer or switchgear upgrade | Electrical service capacity rivals the charger cost | Upper end of the DC fast range |
These scenarios are illustrative, using only the ranges already given. Substitute your own facts before you budget: count the ports, measure the conduit distance, and check spare panel capacity. Also note the parking surface, because asphalt, concrete, pavers, and garage decks create different restoration scopes.
A clustered layout usually wins on cost because ports share trenching, feeders, mobilization, and inspection time.
Recognize your case by the constraint, not the charger catalog. If distance is your constraint, civil work leads. If capacity is your constraint, upstream electrical work leads. If neither is constrained, hardware and labor become the main comparison.
Permit and Utility Timelines That Delay Payback
Schedule risk can cost you more than a hardware upgrade. The 2025 DOE tech brief summarizing Electrify America's 2025 annual report and related analysis states that permitting for U.S. DC fast-charging stations averaged 104 business days, utility interconnection averaged 65 weeks, and utility construction, inspection, and energization occurred an average of 19 weeks after the charging station itself was completed. Read those as three separate clocks. They don't all start on the day you sign a contract, and they don't finish together.
Three Clocks, Three Financial Effects
Permitting controls when construction can legally start and when corrections must be resubmitted. Utility interconnection controls whether new or upgraded service will be available at the capacity your design assumes. Energization controls when drivers can charge. A project can look complete in the parking lot while it earns nothing, serves no tenant, and still disrupts stalls with barriers, stored equipment, or unfinished restoration.
That gap changes your EV charging station installation cost analysis even when the construction invoice doesn't change. You've paid for hardware, labor, and possibly storage, but your payback clock hasn't started. If you promised residents or tenants a launch date, you're also managing expectations while the equipment sits idle. Review the full EV charging station requirements before design so permit drawings, load calculations, and utility scope don't drift apart.
Plan Around the Utility, Not After It
Start the utility application before you order equipment whenever the design needs new capacity, a transformer, or make-ready work. Ask the utility for its interconnection timeline and any load study requirement in writing. A verbal estimate from a sales meeting isn't a schedule you can put in a pro forma.
- File early: Submit the utility application as soon as the load and layout are stable enough to describe accurately.
- Phase energization: Design the first ports to energize earlier when capacity allows, instead of waiting for full build-out.
- Date revenue: Build tenant, customer, and payback assumptions around the energization date, not the construction finish date.
- Track resubmittals: Budget plan review cycles as schedule risk, because corrected drawings can restart review queues.
Permit fees and review times vary by city and county, so request the current fee schedule from your local building department rather than relying on a national figure. Ask whether the fee is per project, per port, or tied to valuation, and whether electrical, building, fire, planning, or public works reviews apply. Those answers belong in the permits and utility budget before you approve the bid.
Schedule check: If a proposal gives you a construction duration but no utility milestone, it hasn't given you a completion schedule.
Confirm three things before you commit. First, who files the utility application and owns follow-up. Second, what interconnection date the utility has stated in writing. Third, whether the contract bills you for equipment stored before energization, and who carries insurance and damage risk during that wait. Put those answers beside the price. A lower bid that energizes months later may be the more expensive project.
Incentives and Net Cost After Rebates
Incentives reduce your net cost, but they don't change the crew, conduit, or switchgear needed to build the project. Keep gross installed cost and net cost after rebates on separate lines from the first estimate. If you blend them, you can't tell whether a bid is cheaper to build or just more optimistic about funding.
Check four program types for your property: utility make-ready or customer-side rebates, state and regional charging grants, local air district or municipal programs, and any federal tax credit still available for your placed-in-service date. Programs differ sharply. Some cover equipment only, others cover make-ready or electrical work, and many require pre-approval or an application before equipment is ordered or work starts.
Convert a Gross Quote Into a Net Figure
- List every program: Identify what's available through your utility, state, and city for the property address and charger type.
- Confirm eligibility: Record deadlines, applicant rules, equipment requirements, and whether pre-approval is required.
- Map to five budgets: Match each program to hardware, labor, civil work, service capacity, or permits and utility fees.
- Subtract confirmed amounts: Deduct the eligible incentive from gross installed cost per port to get net cost per port.
- Protect payback: Keep the gross figure in your payback calculation until awards are confirmed in writing.
Ask your contractor to show gross cost, incentive amount, and net cost per port on the quote. That format exposes ineligible lines early and prevents a rebate assumption from hiding an underscoped panel or trench.
How to Cut Costs and Calculate Payback
The largest savings often come from the electrical path, project phasing, and peak load. A lower-priced charger may have little effect on the total if the site still needs long trenches or a service upgrade.
- Phase the build: Install shared infrastructure for the planned layout, then add ports as demand supports them.
- Cluster ports: Group ports to share trenching, feeders, and communications rather than scattering them across the site.
- Manage the load: Use managed or time-based charging to serve vehicles without assuming every port draws full power at once. This can reduce the need for service upgrades.
- Confirm incentives first: Check utility, state, and local programs, and confirm eligibility before signing or ordering equipment.
- Bundle civil work: Coordinate trenching with planned paving, concrete, landscaping, or parking lot repairs to avoid cutting and restoring the same surface twice.
Managed charging can let more vehicles share available electrical capacity. The design still has to meet code and equipment requirements and gain approval from the authority having jurisdiction. A site-specific load assessment determines whether this approach can delay or avoid a service upgrade. See the overview of EV charging load management for more on power sharing within a set panel or service limit.
Collect the Payback Inputs First
| Input | Where to Get It | Why It Changes Payback |
|---|---|---|
| Installed cost per port | Itemized quote split into five budgets | Sets the capital base for the calculation |
| Electricity price by time of day | Utility tariff and charging logs | DC fast-charging electricity usually costs more per kWh than residential Level 2 electricity. Confirm the applicable tariff. |
| Demand charges | Utility bill and peak kW readings | Can outweigh energy costs at higher power levels |
| Utilization per port | Session logs or conservative projections | Drives revenue or tenant value per port |
| Maintenance and network fees | Vendor agreements | Recurring costs across the equipment life |
| Downtime and energization date | Utility schedule and interconnection plan | Delays revenue while installed equipment waits to energize |
Use the tariff that will apply after the new load is added, including time-of-use windows, demand charges, and any EV-specific rate. Electricity costs vary by rate plan and charging schedule, so a charger's power level alone cannot establish its operating cost.
Run the Simple Calculation
Use this sequence per port:
Annual net value equals annual charging revenue or tenant value, minus electricity, demand charges, network fees, payment costs, and maintenance.
Simple payback equals net installed cost per port divided by annual net value per port.
For free charging, keep tenant retention, leasing, employee, or customer value separate from revenue and label it as an assumption. That makes the model easier to assess.
Run payback twice, once at expected utilization and once at half of it. If the project only works at full utilization from month one, it's not ready.
Downtime can change the result. A busy port may underperform if it is offline, blocked, or waiting for energization; a lightly used port may need a longer payback period even when operating costs are low. Include network subscriptions, payment processing, preventive maintenance, repairs, and applicable connectivity costs in total cost of ownership.
Price the design choices before bidding: trench length, shared infrastructure, managed peak load, and phasing all affect project cost. Compare those savings with the cost of adding capacity, and test payback under more than one utilization assumption.
Get an Itemized Quote Before You Commit
A catalog price can't see your panel schedule, parking surface, or utility service. An accurate estimate needs a site visit where the contractor confirms panel details, distance to the stalls, mounting conditions, and utility information. That's how you turn a national range into a property-specific EV charging station installation cost.
Request these items in every proposal:
- Five-budget breakdown: Hardware, labor, civil work, electrical service capacity, and permits and utility fees shown separately.
- Capacity assumption: Spare panel capacity, load calculation basis, and whether a panel or transformer upgrade is included.
- Permit and utility scope: Who files, who pays fees, and which inspections and make-ready tasks are included.
- Interconnection timeline: Expected utility milestones and energization date in writing.
- Incentive lines: Gross cost, assumed incentive, and net cost per port, with eligibility status.
- Exclusions: Concrete restoration, repaving, landscaping, bollards, signage, networking, and future-port rough-in stated plainly.
Access Electrical & Lighting is a licensed and bonded California C-10 contractor, license 952234, serving Orange County. We offer EV charger services for commercial facilities and provide free estimates. You can request a free estimate by calling 949-364-6063 to schedule a site visit.
Compare two itemized bids line by line, budget by budget, before you compare totals. The lowest total is only credible when both bids carry the same capacity, trench, restoration, permit, and energization scope.
If you're pricing EV charging for a commercial, retail, office, or multifamily property, we can assess your panel capacity, electrical path, trenching scope, and utility requirements, then provide an itemized free estimate before you commit. Visit Access Electrical and Lighting to contact our team and schedule your site visit.